Being able to display value of counter, sensors and other debugging information is an important part of embedded software development. Writing software for PCs is much easier in this regard as there is already a monitor to print values to. For embedded systems the obvious solution is to use a LCD connected to the microcontroller's port pins and with the use of the proper LCD library one can then print values to it. This does however increase the development cost if your hardware platform does not already contain a LCD and usually also requires additional interfacing circuitry.
The ST-LINK/V2 in-circuit programmer on the STM32F4-Discovery board provides a solution. It can receive a stream of characters from the STM32F407VGT6 processor's SWO pin (RB3) and transmit this to the ST-LINK Utility's Serial Wire Viewer (SWV). In short: by using the proper library and printf statements in your ARMmbed code you can print data to a PC and view it with the Serial Wire Viewer (SWV).
STM32F4-Discovery Board requirements:
-
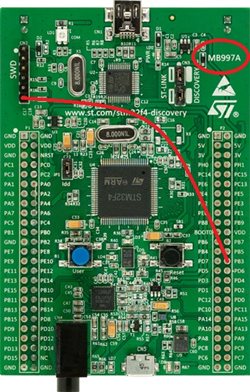
If you have the MB997A version of the board, it means that the SWO pin (PB3) of the STM32F407VGT6 processor is NOT hardware linked to the ST-LINK/V2. You then need to connect a wire link between PB3 and pin6 of the SWD connector (CN2).
-
If you have the MB997C version, the hardware link is already done on the PCB and you don't have to do anything else.
ARMmbed program requirements:
-
Import the SWO library (Author: Wim Huiskamp) as explained in the Importing libraries section on the Using the Online IDE page.
-
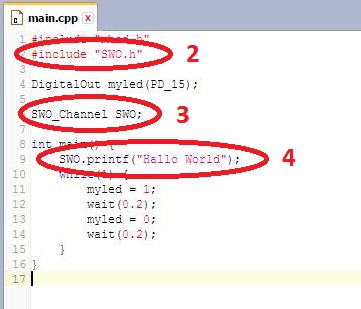
Use #include "SWO.h" to include the library in your program.
-
Create a SWO_Channel object, e.g. SWO_Channel SWO.
-
Use the SWO_Channel object's printf method to send characters/strings to the Serial Wire Viewer on the PC.
Using the Serial Wire Viewer (SWV):
-
With STM32 ST-LINK Utility open, select ST-LINK -> Printf via SWO viewer.
-
Set System clock (HZ) to 168000000 (which is the clock speed of the STM32F4-Discovery).
-
Set the Stimulus port to 0.
-
Click Start. The Start button now changes to Stop.
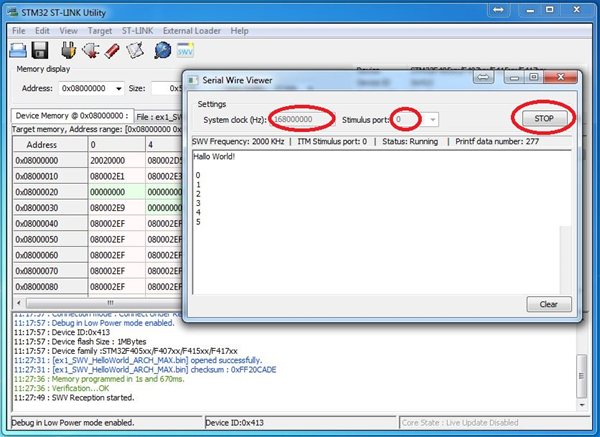
The Start button starts communication between the SWV and the ST-LINK/V2 programmer and essentially "resets" the STM32F4-Discovery board the first time it is clicked, thereafter you can use the physical Reset button on the board.
The SWV does not automatically restart itself when new code is downloaded and will seize displaying messages from printf statements. To prevent this, click on Stop and then again on Start every time new code is programmed to the board.
The class library that will be used in this section and that needs to be imported is:
-
SWO_Channel (Author: Wim Huiskamp, Dec 2014, search: "serial wire viewer") - Serial Wire Output (SWO) viewer for tracing purposes.
The following example programs will demonstrate the principles of using the Serial Wire Viewer: